Asciidoctor Diagram
Pepijn Van_Eeckhoudt <@pepijnve>; Sarah White <@graphitefriction> :description: README for the Asciidoctor Diagram extension for Asciidoctor. :icons: font :source-highlighter: coderay :source-language: asciidoc :table-caption!: :example-caption!: :figure-caption!: :check: :uri-actdiag: http://blockdiag.com/en/actdiag/index.html :uri-asciidoctor-api: http://asciidoctor.org/docs/user-manual/#api :uri-asciidoctor-extensions: http://asciidoctor.org/docs/user-manual/#extension-points :uri-blockdiag: http://blockdiag.com :uri-ditaa: http://ditaa.sourceforge.net/ :uri-dot: http://www.graphviz.org/content/dot-language :uri-graphviz: http://www.graphviz.org :uri-imagemagick: http://www.imagemagick.org :uri-java: http://java.sun.com :uri-mermaid: http://knsv.github.io/mermaid/ :uri-nwdiag: http://blockdiag.com/en/nwdiag/index.html :uri-packetdiag: http://blockdiag.com/en/nwdiag/index.html :uri-phantomjs: http://phantomjs.org :uri-plantuml: http://plantuml.sourceforge.net :uri-py-plantuml: https://code.google.com/p/asciidoc-plantuml/ :uri-rackdiag: http://blockdiag.com/en/nwdiag/index.html :uri-seqdiag: http://blockdiag.com/en/seqdiag/index.html :uri-shaape: https://github.com/christiangoltz/shaape :uri-wavedrom: http://wavedrom.com :uri-wavedromeditor: https://github.com/wavedrom/wavedrom.github.io/releases :uri-wavedromcli: https://github.com/wavedrom/cli
Asciidoctor Diagram is a set of Asciidoctor extensions that enable you to add diagrams, which you describe using plain text, to your AsciiDoc document.
The extensions support BlockDiag (BlockDiag, SeqDiag, ActDiag, NwDiag), Ditaa, GraphViz, Mermaid, PlantUML, Shaape and WaveDrom syntax.
Each extension runs the diagram processor to generate an SVG, PNG, or TXT file from the input text. The generated file is then inserted into your converted document.
Asciidoctor Diagram was inspired by the {uri-py-plantuml}[AsciiDoc PlantUML filter].
Translations of the document are available in the following languages:
Installation
Asciidoctor Diagram is a RubyGem, which can be installed using the gem or bundle commands.
You can install the Asciidoctor Diagram gem by typing gem install in the CLI.
$ gem install asciidoctor-diagram
by first adding the following entry to your project’s Gemfile.
gem 'asciidoctor-diagram', '~> 1.4.0'Then execute bundle in the CLI.
$ bundle
Creating a Diagram
A diagram is written inside a literal block, which can accept several attributes.
[diagram-type, generated-file-name, generated-image-format] (1) (2) (3)
.... (4)
Diagram in appropriate syntax
....
| 1 | The first positional attribute in the attribute list specifies the diagram that is being used. |
| 2 | The second, optional positional attribute assigns a file name (i.e. target) to the generated diagram. If a target is not specified an auto-generated name will be used. |
| 3 | The third, optional positional attribute specifies the image format to create, specified as a three character file extension. |
| 4 | Place the attribute list directly on top of the delimited literal block (….). You can also use an open block as an alternative (--). |
The following diagram types and output formats are available:
| Diagram Type | gif | png | svg | txt |
|---|---|---|---|---|
{uri-actdiag}[actdiag] |
{check} |
{check} |
||
{uri-blockdiag}[blockdiag] |
{check} |
{check} |
||
{uri-ditaa}[ditaa] |
{check} |
|||
{uri-dot}[graphviz] |
{check} |
{check} |
||
{check} |
{check} |
|||
{uri-mermaid}[mermaid] |
{check} |
{check} |
||
{uri-nwdiag}[nwdiag] |
{check} |
{check} |
||
{uri-packetdiag}[packetdiag] |
{check} |
{check} |
||
{uri-plantuml}[plantuml] |
{check} |
{check} |
{check} |
|
{uri-rackdiag}[rackdiag] |
{check} |
{check} |
||
{uri-seqdiag}[seqdiag] |
{check} |
{check} |
||
{uri-shaape}[shaape] |
{check} |
{check} |
||
{uri-wavedrom}[wavedrom] |
{check} |
{check} |
The example below illustrates the structure of a basic ditaa block written directly in an AsciiDoc document.
[ditaa]
....
                   +-------------+
                   | Asciidoctor |-------+
                   |   diagram   |       |
                   +-------------+       | PNG out
                       ^                 |
                       | ditaa in        |
                       |                 v
 +--------+   +--------+----+    /---------------\
 |        | --+ Asciidoctor +--> |               |
 |  Text  |   +-------------+    |   Beautiful   |
 |Document|   |   !magic!   |    |    Output     |
 |     {d}|   |             |    |               |
 +---+----+   +-------------+    \---------------/
     :                                   ^
     |          Lots of work             |
     +-----------------------------------+
....
The ditaa block above results in the following generated diagram.
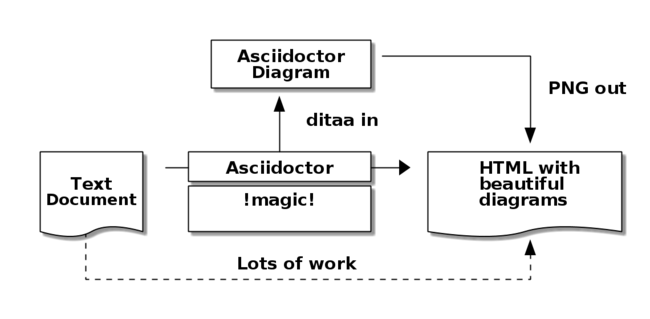
The rendered ditaa diagram above gets the file name 58372f7d2ceffae9e91fd0a7cbb080b6.png.
That long number is the checksum of the source code calculated by asciidoctor-diagram.
If you want to give your generated files a more meaningful name, fill in the target attribute.
This can be done by either specifying it as the second positional attribute or as a named attribute.
Both examples below would result in a file called ditaa-diagram.png.
[ditaa, "ditaa-diagram"]
----
<snip>
----

[ditaa, target="ditaa-diagram"]
----
<snip>
----
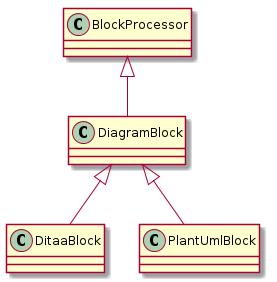
The example below illustrates the structure of a basic PlantUML block written directly in an AsciiDoc document.
[plantuml, diagram-classes, png] (1) (2) (3)
....
class BlockProcessor
class DiagramBlock
class DitaaBlock
class PlantUmlBlock

BlockProcessor <|-- DiagramBlock
DiagramBlock <|-- DitaaBlock
DiagramBlock <|-- PlantUmlBlock
....| 1 | The diagram is written in PlantUML so the first positional attribute is assigned the plantuml diagram type. |
| 2 | The name of the generated diagram file (target) is written in the second positional attribute. |
| 3 | The output format is entered in the third positional attribute. |
Generating a Diagram from a Terminal
You can load Asciidoctor diagram in a terminal using the -r flag.
$ asciidoctor -r asciidoctor-diagram sample.adoc
You can also use Asciidoctor diagram with other converters, such as Asciidoctor EPUB.
Asciidoctor-epub3 is also loaded with the -r flag.
$ asciidoctor -r asciidoctor-diagram -r asciidoctor-epub3 -b epub3 sample.adoc
Or, you can invoke Asciidoctor and the EPUB converter with the asciidoctor-epub3 command.
The command implicitly sets the -r and -b flags for EPUB3 output.
$ asciidoctor-epub3 -r asciidoctor-diagram sample.adoc
Advanced Usage
Enabling Extensions
In your program, you can either load and register the entire set of diagram extensions
require 'asciidoctor-diagram'or load and register each extension individually.
require 'asciidoctor-diagram/<extension_name>'<extension_name> can be one of blockdiag, ditaa, graphviz, meme, mermaid, plantuml, shaape, or wavedrom.
Requiring one or more of these files will automatically register the extensions for all processed documents.
If you need more fine grained control over when the extensions are enabled, asciidoctor-diagram/<extension_name>/extension can be used instead.
This loads the extensions but does not register it in the Asciidoctor extension registry.
You can then manually register the extensions at the appropriate times using the Asciidoctor::Extensions API.
This document explains the various features of asciidoctor-diagram blocks using ditaa diagrams as an example.
Diagram Block Macro
The diagram extensions can also be used in in block macro form.
block-name::source-file-name[generated-file-extension] (1) (2) (3)
| 1 | The macro name is the same as the block name in the block form. |
| 2 | The source file name specifies the external file that contains the diagram source code. |
| 3 | The first, optional, positional attribute assigns the file extension (i.e. format) to the generated diagram. |
When the source file name is a relative path it is resolved with respect to the location of the document being processed.
Image Output Location
When Asciidoctor Diagram writes images to disk it will go over the following options in order to determine where to write the files.
-
\{imagesoutdir\}if theimagesoutdirattribute has been specified -
\{outdir\}/\{imagesdir\}if theoutdirattribute has been specified -
\{to_dir\}/\{imagesdir\}if theto_dirattribute has been specified -
\{base_dir\}/\{imagesdir\}
Specifying Diagram Generator Paths
Asciidoctor Diagram depends on external tools to generates images.
In most cases it will locate these tools automatically for you by looking for specific executables in each directory in the PATH environment variable.
In case you’ve installed a tool in a way where the executable is not in the PATH, you can override its location manually using document attributes.
The following table lists the tools that are required for each diagram type, the location where they can be downloaded and the document attribute you can use to override their locations.
| Diagram Type | Tool | Attribute |
|---|---|---|
actdiag |
{uri-actdiag}[ActDiag] |
|
blockdiag |
{uri-blockdiag}[BlockDiag] |
|
ditaa |
{uri-java}[Java] |
|
graphviz |
{uri-graphviz}[GraphViz] |
|
meme |
{uri-imagemagick}[ImageMagick] |
|
mermaid |
{uri-mermaid}[Mermaid] |
|
nwdiag |
{uri-nwdiag}[NwDiag] |
|
packetdiag |
{uri-nwdiag}[NwDiag] |
|
plantuml |
{uri-java}[Java] |
|
rackdiag |
{uri-nwdiag}[NwDiag] |
|
seqdiag |
{uri-seqdiag}[SeqDiag] |
|
shaape |
{uri-shaape}[Shaape] |
|
wavedrom |
{uri-wavedromeditor}[WaveDrom Editor] |
|
{uri-wavedromcli}[WaveDrom CLI] and {uri-phantomjs}[PhantomJS] |
|
If for instance you installed actdiag in /home/me/actdiag/bin and this path is not included in the PATH you can specify its location on the command line
$ asciidoctor -a actdiag=/home/me/actdiag/bin/actdiag -r asciidoctor-diagram sample.adoc
The Meme Extension
The meme extension provides a basic Advice Animal style image generator.
It’s usage is easiest to explain with an example.
meme::yunoguy.jpg[Doc writers,Y U NO \\ AsciiDoc]
The target of the block macro tells the extension which image to use as background.
The first two positional attributes are top and bottom and are used for the top and bottom label.
Occurrences of \\ surrounded by whitespace are interpreted as line breaks.
The block macro also supports the following named attributes:
-
fillColor: the fill color for the text. Defaults towhite. -
strokeColor: the outline color for the text. Defaults toblack. -
strokeWidth: the width of the text outline. Defaults to2. -
font: the font face to use for the text. Defaults toImpact. -
options: a comma separate list of flags that modify the image rendering. Currently onlynoupcaseis supported which disable upper casing the labels. -
target(3rd positional attribute): the basename of the file to generate. If not specified an auto-generated name will be used. -
format(4th positional attribute): the output image format. The meme extension supportspngandgif.